Onion Herbed Meatballs

I have been away for far too long, my food loving friends. I apologize. Sometimes, as we know, life happens. But the good and delicious news is that I am back! And I plan to stay back! As we all also know, I am a big fan of food that you can make ahead of time and freeze to have available at your disposal when you need it. Mayhap it is cooked and only needs to be thawed and reheated. Perhaps it is still raw and needs to be cooked upon defrosting. The details of that depend on the particulars of the situation. However, the more work you can do in advance to help you out when you are short on time, need something to take to work for lunch, are short on energy, or otherwise need a boost in the kitchen, the better. One of the dishes that I’ve recently come to be a fan of in this department is the meatball. You can make a whole passel of them without too much trouble, freeze them right up, and then you have them at your beck and call to parcel out as you need. How beautiful is that?? The recipe below is my second pass at these meatballs, and I’ll probably continue to play with the recipe, so keep your eyes and taste buds on the lookout for additional meatball recipes in the near future.

Onion Herbed Meatballs and Pasta

Onion Herbed Meatballs (inspired by recipes in my cookbooks by Alton Brown and Mark Bittman – those are some good cooks, y’all!)

Ingredients
1 lb lean ground beef (I used 93% lean)
1 lb Italian sausage
1 cup minced onion
2 tbsp minced garlic
½ – 1 tablespoon butter or olive oil (your preference)
1/2 cup low fat ricotta cheese
1/2 Panko bread crumbs
1/4 cup grated Parmesan cheese
1 egg
2 tablespoons chopped fresh Italian flat leaf parsley*
2 teaspoons dried pasta sprinkle (From Penzeys: dried oregano, basil, garlic, thyme)
1 teaspoon dried basil (not pictured – late addition)
Pinch of salt – to taste

Steps
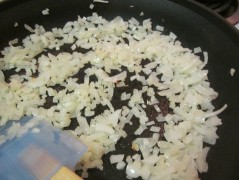
1. Sauté your minced onions in a little bit of either the butter or olive oil (your preference) until they are soft and translucent. I let mine go until they got just the slightest bit of brown around the edges of a few. Take them off the heat, and let them cool while you work with the rest of the ingredients.
           
2. In a regular bowl, combine your ricotta cheese and bread crumbs. They can sit together for a few minutes to combine a bit.

3. In a large, roomy bowl, put in your beef, sausage, garlic, Parmesan cheese, salt, and herbs.
(When I was chopping my Italian parsley, I started with an overflowing, loosely packed 1/2 cup of leaves. I chopped them into a regular packed 2 tablespoons with a bit left on the cutting board. You can check out the pictures to see what I mean.)
                   
4. Beat your egg and pour into the bowl.
5. Add the ricotta and breadcrumb mixture.
6. Add the onions.
7. Using your kitchen’s best tools – your hands (how often do you hear that on the Food Network??), mix it together. Try to do it quickly and without too many passes through the meat, but also making sure the cheese and herbs get evenly distributed. The less you work the meat, the better. The more you handle the meat, the more likely you are to have a dense, tough meatball. It’s a similar concept to pie or biscuit dough.

8. I use a ½ tablespoon measure to scoop out a couple of measures of meat, loosely form them into a ball, and pan-fry them to taste-test for seasoning and flavor. You may wish to add an additional pinch of salt after tasting, more herbs, or more garlic. This is when I adjusted many of my seasonings that made the final ingredient list for your benefit.
9. Once your taste-testing has been done, and final seasonings added and mixed, preheat the oven to 400 degrees, and set a jelly roll pan up with foil underneath a cookie cooling rack. (See picture below for set-up.) Begin to scoop and roll. Scoop and roll. Scoop and roll. Keep at it until all the mixture has been made into your meatballs. Mine didn’t all fit on the sheet at once, but I rolled them anyway to be prepared. Be gentle when rolling your meatballs. Remember – the less handling the better.
         
10. Bake for 10 minutes, flip, and bake another 9. Take out of the oven and place on a paper towel lined surface. Repeat if necessary. Let cool just a bit before putting in the fridge. I recommend time in the fridge before freezing. And if you eat some while they are hot, I won’t judge, but mind that they don’t take the top layer of your tongue off.

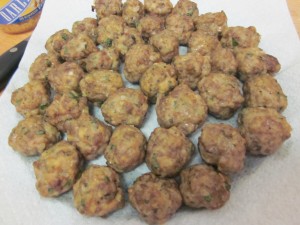
Baked Meatball Deliciousness

*I used Italian flat leaf parsley because that’s what I had. Really any mixture of Italian herbs would do. I might use basil if I had some available or oregano or perhaps even rosemary. Use what you have at your disposal. I think it might be hard to go wrong with fresh herbs here. Unless you were using mint. That might not be good eats.

An additional note, these are quite onion-y as a cup of minced onions is a fair bit of onions. Sometimes when I make a dish the first time, I’m just winging it as I go along and not really measuring at all. The second time, when making for the blog, I usually tend to over-measure which I think I did with the onions. I like onions so I am okay with it, but if you are less of an onion fan, you might want to consider reducing that amount. I may even reduce it the next time around to let other flavors shine through. However, the boyfriend who is frequently in the anti-onion camp was just fine with them, so it just might be alright.

The rationale for my advice to you for letting your meatballs spend some time in the fridge prior to putting them in the freezer is fairly simple. You don’t want to put warm or hot food in the freezer next to other foods where it could bring the temperature of said food up. Certainly it won’t unfreeze, but if it gets a little melty and refreezes around the edges, that’s not good for your food. I’ve never done this myself, but I would be suspicious that if I put too much hot food in my freezer at once, it would be quite negative for the overall temperature of the freezer. Thus, I put slightly cooled foods in my fridge to cool all the way down. That is bacterially safer than letting it cool all the way down on the counter. I try not to put warm food next to anything dairy in the fridge, or near anything that makes me nervous in my gut for heat transfer. If possible, I’ll put some space around the cooling food to help with air circulation. Food safety first, people.

One of the reasons I choose to go with such a lean ground beef in this recipe is because the Italian sausage has quite a bit of fat in it. It is, after all, sausage. It more than makes up for the lack of fat in the ground beef, and the ricotta also helps keep the meatballs from being dry. Please don’t be afraid of using a lean beef in conjunction with the sausage. I promise, it is okay. I’m even considering exploring turkey with the sausage. I know that’s a little odd, but hey – someone’s got to try it, right? I can take one for the team. My grocery store carries the Italian sausage ground without the casing which is quite handy. If you can’t find that, just get mild Italian sausage with the casing, and then cut the meat out of the casing, dispose of the casing, and proceed onward. It might be tasty to explore a flavored Italian sausage here as well. LOTS of possibilities!

My recipe made 54 meatballs, all told. I think this is fantastic because now I’ve got tons of frozen meatball goodness in my freezer, and they are small enough to defrost quickly after work on a night when I was forgetful to pull something else out, or they can thaw in the time between breakfast and lunch so I can eat them for lunch at work. And friends, let me tell you, my last batch smelled so good that my co-workers were perpetually jealous of my lunch every time I heated up these meatballs. They were that good. Fifty-four meatballs will last the single eater (or even double eaters) quite a while. It’s such a great plan-ahead item. And with lots of room for improvising, I can’t wait to hear how you made these your own meatballs! Happy Eating!

Nutritional Information – Per Meatball                 

Calories: 50.7
Fat: 3.6 g
Protein: 3.7 g
Calcium: 1.3%
Iron: .8%

Roasty Toasty Red Salsa

I love chips and salsa above all other foods out there, nearly. If we are in a fight and you want to send me a reconciliation gift, chips and salsa will be a guaranteed winner. If I am sick, chips and salsa will make me feel better. If I’m grouchy, I would like chips and salsa to the rescue, please! I will almost always pick the restaurant with free chips and salsa over the one without, or heaven forbid, the restaurant that charges for them. Those places are evil and might should be boycotted, in my opinion. Ahem. So salsa pretty much rocks my socks. If you pop over to the Food Memories page, you’ll see that I grew up with salsa and came by my affection for it honestly. My dad makes homemade salsa, and one day, I decided I was going to make my own homemade salsa, too. Oh boy! It was the start of a beautiful thing. At first, it was a more chopped up version of pico de gallo, made in tiny batches in my wee food processor attachment on my blender stand. Since then, I’ve graduated to an adult food processor and have been experimenting all over the place. I’ve learned that I love to roast my salsa ingredients. I have learned that kiwi salsa is delicious. I’ve learned that homemade salsa is for sharing as I cannot eat (or at least, should not eat) the whole batch. I suppose you could cut the recipe in half to make a smaller batch, but why deprive a friend of your culinary delights??  Have your friends over for game night, and let them marvel when you serve them homemade salsa. I won’t judge if you don’t put it all out so you can have some the next day; that’s only good sense.

DELICIOUS!

There are many more salsa recipes to come, but this is the most recent edition to come from my kitchen. Don’t be frightened by the surprise herb – it actually provides quite a pleasant taste. Thanks, Rick Bayless, for the inspiration!

Roasty Toasty Red Salsa (adapted from Salsas That Cookby Rick Bayless)

Ingredients*
1 lb Roma tomatoes (sometimes also called plum – the ones that are more oval than circle)
6 ounces poblano chiles (probably 2 regular-sized ones)
1/2 red onion (or to taste)
4 – 6 med-lg garlic cloves
1/2 cup tomato puree
2 tsp fresh thyme, chopped
2 tbsp fresh cilantro, chopped (recommended, but optional for those who are not cilantro eaters – not a deal breaker)
1/4 – 1/2 cup water
dash of salt

Steps
1. Set your oven rack near the top of your oven, and turn on the broiler. Line a rimmed baking sheet with foil, and lay out the tomatoes and peppers. Broil (maybe 5 – 8 minutes) until the skin is charred and blistered. Flip everything over to roast the other side. Continue this process until all sides are well blackened. Don’t be afraid of the char. You are likely to hear the skin sizzle and pop; don’t be afraid of that either. When everything is charred, pull the pan out of the oven and let cool.

2. Put the peppers in a plastic bag, and wrap with a towel. They won’t melt the bag, and it will help the skins come off later. Leave the tomatoes on the pan to cool.
3. While the tomatoes and peppers are in the oven, slice the onion into slices. Err on the side of thicker rather than thinner. Aim for a quarter to half inch slice. As much as possible, keep them uniform so they’ll cook evenly. That’s probably more important than width of the slice. Peel the garlic, leaving the last layer of papery covering (this will keep it from burning). On another foil-lined, rimmed baking sheet, lay out the onion and garlic. Roast them until the onions are soft, there is some char on the edges, and the garlic is soft when pressed. Stir a few times while they are roasting. This may take 15 minutes or so. Let cool on the pan when you take them out.

4. Using tongs, a knife, and/or your hands, peel the skins off the tomatoes, and pull the flesh off the core. I have yet to roast them long enough for the core to get soft – so get rid of the hard feeling middle. Do all of this on the pan so you don’t lose any juices. Leave the flesh on the pan to cool a bit before you go back to them in step 9. Discard the skin and core.

5. Using the same tools, over the same sheet of tomato pulp, if possible, pull off and discard the skins from the peppers. The blacker the skin is, the easier it will just peel right off. Tear open the peppers and scrape out the seeds, if you want a milder salsa. More seeds = more heat. Your call. Please don’t rinse them – you’ll lose flavor. They will likely drip juice into the tomatoes, which is okay. That’s why you are peeling them over the tomatoes in the first place.
6. Chop the peppers into small, bite sized pieces. They won’t get any smaller later in the prep, so dice away. Scrape the pieces and the juice from the cutting board into a clean serving bowl.

7. Chop your thyme and cilantro, and toss into the serving bowl.
8. Pulse your roasted onion and peeled garlic cloves in a small food processor to finely chop them. Add some of the tomato if the mixture needs some liquid to help facilitate the job. Scrape into your bowl with the peppers.
9. In the same food processor bowl, put the cooled tomatoes and their juices and whir away. Dump into the serving bowl where the peppers and herbs are waiting.
10. Stir in the tomato puree, and slowly add the water to get to the consistency you want. Go slowly with the water because you can’t take it back out. Season to taste with some salt, but go easy as your chips will likely also be salty.

*Notes about ingredients: I had ginormous Roma tomatoes so it only took 3 to make a pound. It would probably take 5 – 7 regular-sized Roma tomatoes for a pound. I was also using poblano peppers that my dad brought me which were WAY smaller than store-bought poblanos. My four were 6 ounces which is why I suspect 2 regular-sized ones would be sufficient. I don’t usually measure my herbs – I just chopped what looked good to me. I like lots of cilantro, so it’s possible I had more than 2 tbsp. I recommend not going overboard with the thyme until you are certain you’ll like it. I will probably add a bit more next time. Also, if you don’t have enough poblanos, I think Anaheims would be a good addition which will also decrease the spiciness.

Large Romas and Small Poblanos

I’m nervous about giving you a recipe with 10 steps. Please don’t be intimidated as many of the steps are simple. Plus I’m overly detail-oriented sometimes. 🙂 Many of the steps can be accomplished while items are either roasting or cooling. I promise you that it’s totally worth 10 steps! This salsa will be a little saucier because of the water and puree. Once, I thickened mine up using my immersion blender to chop it all up into smaller pieces. It’s delicious either way. Rick Bayless encourages you to use it in place of tomato sauce with fish or pork or even mac and cheese.

I watch a lot of “Good Eats” on Food Network, and Alton Brown frequently uses latex gloves (medical style) when dealing with peppers. At first I laughed at him, just a little, and thought it was sort of wimpy. But then…one unfortunate day, I got pepper juice in my eye. It came from my finger which had been washed, at least twice. There are hardly words to describe how terrible the experience was. I promptly went to buy rubber gloves, and now I’m a convert. It makes it easier to use your hands to seed the peppers, and then the gloves come right off into the trash without threat to your sensitive parts. I encourage you to try it, also. Safety first, people.

What is your favorite kind of salsa? Keep your eyes peeled for more salsas coming soon to a food blog near you. Happy eating!

Nutritional Information – 1/4 cup (This may be the best part!!!)      
Calories: 18
Fat: 0.2 g
Carbs: 4.1 g
Fiber: 1 g
Vitamin C: 27%

Baked Chicken and Onions

I made this dish recently as a welcome home meal for my grandmother who was returning to her house after being in nursing home rehab all summer long. We invited her best friends to join her, my mom, and me.  When it was time to serve dinner, I got nervous cooking for everyone, but it turned out just wonderfully. Folks had seconds, and everyone had very complimentary things to say during the meal. Mary even wrote down the recipe before she left that night so she could make it at home, too. I think that’s an excellent compliment. I’ve also made this dish to take to friends who had just had a baby so I think it travels well also. There are two variations in the marinade, and I’ve made both so I’ll share how they each turned out along with their pluses and minuses. Give both a try to see what works for you!

Baked Chicken and Onions

Ingredients
1 fryer chicken/4 bone-in chicken breasts/2 lbs of chicken strips (I had chicken strips so that’s what I used.)
1 medium-large onion
1/3 cup flour
Generous pinch of ground rosemary
1 cup boiling water
¼ cup reduced-sodium soy sauce
4 tsp lemon juice
¾ tsp ground ginger
1 tsp poultry seasoning

Steps

1.       Marinate your chicken in a zip-top bag in the fridge using either Step A or Step B.
A.      You can marinate it in the sauce ingredients (the last four in the list) and then add the sauce to the pan before baking. It adds a nice brown color to the chicken, but it can get too salty very quickly with the soy sauce.
B.      You can marinate your chicken in Italian salad dressing. Just give a quick rinse before proceeding with the next steps. The brown color is missing, but it stays moist and not overly salty.
2.       Preheat oven to 350 degrees.
3.       In a brown paper bag, put the flour and rosemary. Add the chicken pieces, fold over the top, and give several good shakes so as to coat the chicken with flour.

4.       Brown the chicken in a sauté pan for a few minutes on each side. You are looking for a slightly browned finish, but they don’t need to be fully cooked. (I used an electric skillet because that’s what my grandmother has. At home, I would have used a regular skillet.)
5.       While the chicken is browning, slice the onion into thin rings and put them in a thin layer on the bottom of your baking dish.

6.       Combine the last four ingredients to create your sauce if you didn’t do that to create the marinade during Step 1.
7.       Put the chicken on top of the onion layer; add in the sauce and the boiling water.
8.       Cover tightly with a lid or foil, and bake for 20 – 25 minutes. If you are using bone-in chicken, it will take closer to 45 minutes to cook. I took the chicken out halfway and turned the strips over so that both sides were in contact with the sauce which helped create the lovely browned look for the chicken. This is not necessary though – purely for aesthetic reasons.


Temperature Tip: When you bring meat out of the refrigerator where it’s been marinating, let it rest on the counter for a while to come up to room temperature. It will cook more evenly in the pan if you let it warm up a bit. It is totally acceptable to let it sit on the counter for somewhere from 30 minutes to an hour. I was at a BBQ class once, and the instructor-chef-man said he lets his beef rest at room temperature for 2 hours without being worried about bacteria or anything. All the chefs and cooks on Food Network also recommend taking the chill of the meat. If you put cold meat in a pan to cook, the outside will often cook much faster than the inside which leaves you with dried-out or burned meat. That’s not good eats.

I am a big fan of Penzey’s Spices (see their link on my left side bar!), and for a few years, they put out a magazine, Penzey’s One. It was a wonderful magazine full of stories about people and the role food plays in their lives. They would highlight certain regional areas or find a theme to gather recipes around. This recipe originally came from a grandmother who was given the recipe on her wedding day in 1948 by her mother. (Penzey’s One: Volume 1, Issue 2, 2005) Even though I’ve changed it just a bit to reduce the salt, I still like that this recipe has history and that there is a connection to a family in the New England area who also eats this. Thanks Barbara Sands for sending Penzey’s your recipe, and thanks to Penzey’s for publishing real life recipes. Happy eating!

Nutritional Content: 2 strips and some onions
Calories: 141
Fat: 1 g
Carbs: 4 g
Protein: 26 g
Iron: 6%