Onion Herbed Meatballs

I have been away for far too long, my food loving friends. I apologize. Sometimes, as we know, life happens. But the good and delicious news is that I am back! And I plan to stay back! As we all also know, I am a big fan of food that you can make ahead of time and freeze to have available at your disposal when you need it. Mayhap it is cooked and only needs to be thawed and reheated. Perhaps it is still raw and needs to be cooked upon defrosting. The details of that depend on the particulars of the situation. However, the more work you can do in advance to help you out when you are short on time, need something to take to work for lunch, are short on energy, or otherwise need a boost in the kitchen, the better. One of the dishes that I’ve recently come to be a fan of in this department is the meatball. You can make a whole passel of them without too much trouble, freeze them right up, and then you have them at your beck and call to parcel out as you need. How beautiful is that?? The recipe below is my second pass at these meatballs, and I’ll probably continue to play with the recipe, so keep your eyes and taste buds on the lookout for additional meatball recipes in the near future.

Onion Herbed Meatballs and Pasta

Onion Herbed Meatballs (inspired by recipes in my cookbooks by Alton Brown and Mark Bittman – those are some good cooks, y’all!)

Ingredients
1 lb lean ground beef (I used 93% lean)
1 lb Italian sausage
1 cup minced onion
2 tbsp minced garlic
½ – 1 tablespoon butter or olive oil (your preference)
1/2 cup low fat ricotta cheese
1/2 Panko bread crumbs
1/4 cup grated Parmesan cheese
1 egg
2 tablespoons chopped fresh Italian flat leaf parsley*
2 teaspoons dried pasta sprinkle (From Penzeys: dried oregano, basil, garlic, thyme)
1 teaspoon dried basil (not pictured – late addition)
Pinch of salt – to taste

Steps
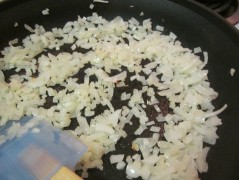
1. Sauté your minced onions in a little bit of either the butter or olive oil (your preference) until they are soft and translucent. I let mine go until they got just the slightest bit of brown around the edges of a few. Take them off the heat, and let them cool while you work with the rest of the ingredients.
           
2. In a regular bowl, combine your ricotta cheese and bread crumbs. They can sit together for a few minutes to combine a bit.

3. In a large, roomy bowl, put in your beef, sausage, garlic, Parmesan cheese, salt, and herbs.
(When I was chopping my Italian parsley, I started with an overflowing, loosely packed 1/2 cup of leaves. I chopped them into a regular packed 2 tablespoons with a bit left on the cutting board. You can check out the pictures to see what I mean.)
                   
4. Beat your egg and pour into the bowl.
5. Add the ricotta and breadcrumb mixture.
6. Add the onions.
7. Using your kitchen’s best tools – your hands (how often do you hear that on the Food Network??), mix it together. Try to do it quickly and without too many passes through the meat, but also making sure the cheese and herbs get evenly distributed. The less you work the meat, the better. The more you handle the meat, the more likely you are to have a dense, tough meatball. It’s a similar concept to pie or biscuit dough.

8. I use a ½ tablespoon measure to scoop out a couple of measures of meat, loosely form them into a ball, and pan-fry them to taste-test for seasoning and flavor. You may wish to add an additional pinch of salt after tasting, more herbs, or more garlic. This is when I adjusted many of my seasonings that made the final ingredient list for your benefit.
9. Once your taste-testing has been done, and final seasonings added and mixed, preheat the oven to 400 degrees, and set a jelly roll pan up with foil underneath a cookie cooling rack. (See picture below for set-up.) Begin to scoop and roll. Scoop and roll. Scoop and roll. Keep at it until all the mixture has been made into your meatballs. Mine didn’t all fit on the sheet at once, but I rolled them anyway to be prepared. Be gentle when rolling your meatballs. Remember – the less handling the better.
         
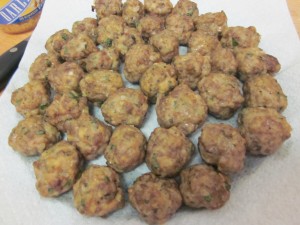
10. Bake for 10 minutes, flip, and bake another 9. Take out of the oven and place on a paper towel lined surface. Repeat if necessary. Let cool just a bit before putting in the fridge. I recommend time in the fridge before freezing. And if you eat some while they are hot, I won’t judge, but mind that they don’t take the top layer of your tongue off.

Baked Meatball Deliciousness

*I used Italian flat leaf parsley because that’s what I had. Really any mixture of Italian herbs would do. I might use basil if I had some available or oregano or perhaps even rosemary. Use what you have at your disposal. I think it might be hard to go wrong with fresh herbs here. Unless you were using mint. That might not be good eats.

An additional note, these are quite onion-y as a cup of minced onions is a fair bit of onions. Sometimes when I make a dish the first time, I’m just winging it as I go along and not really measuring at all. The second time, when making for the blog, I usually tend to over-measure which I think I did with the onions. I like onions so I am okay with it, but if you are less of an onion fan, you might want to consider reducing that amount. I may even reduce it the next time around to let other flavors shine through. However, the boyfriend who is frequently in the anti-onion camp was just fine with them, so it just might be alright.

The rationale for my advice to you for letting your meatballs spend some time in the fridge prior to putting them in the freezer is fairly simple. You don’t want to put warm or hot food in the freezer next to other foods where it could bring the temperature of said food up. Certainly it won’t unfreeze, but if it gets a little melty and refreezes around the edges, that’s not good for your food. I’ve never done this myself, but I would be suspicious that if I put too much hot food in my freezer at once, it would be quite negative for the overall temperature of the freezer. Thus, I put slightly cooled foods in my fridge to cool all the way down. That is bacterially safer than letting it cool all the way down on the counter. I try not to put warm food next to anything dairy in the fridge, or near anything that makes me nervous in my gut for heat transfer. If possible, I’ll put some space around the cooling food to help with air circulation. Food safety first, people.

One of the reasons I choose to go with such a lean ground beef in this recipe is because the Italian sausage has quite a bit of fat in it. It is, after all, sausage. It more than makes up for the lack of fat in the ground beef, and the ricotta also helps keep the meatballs from being dry. Please don’t be afraid of using a lean beef in conjunction with the sausage. I promise, it is okay. I’m even considering exploring turkey with the sausage. I know that’s a little odd, but hey – someone’s got to try it, right? I can take one for the team. My grocery store carries the Italian sausage ground without the casing which is quite handy. If you can’t find that, just get mild Italian sausage with the casing, and then cut the meat out of the casing, dispose of the casing, and proceed onward. It might be tasty to explore a flavored Italian sausage here as well. LOTS of possibilities!

My recipe made 54 meatballs, all told. I think this is fantastic because now I’ve got tons of frozen meatball goodness in my freezer, and they are small enough to defrost quickly after work on a night when I was forgetful to pull something else out, or they can thaw in the time between breakfast and lunch so I can eat them for lunch at work. And friends, let me tell you, my last batch smelled so good that my co-workers were perpetually jealous of my lunch every time I heated up these meatballs. They were that good. Fifty-four meatballs will last the single eater (or even double eaters) quite a while. It’s such a great plan-ahead item. And with lots of room for improvising, I can’t wait to hear how you made these your own meatballs! Happy Eating!

Nutritional Information – Per Meatball                 

Calories: 50.7
Fat: 3.6 g
Protein: 3.7 g
Calcium: 1.3%
Iron: .8%

Perfectly Portioned Tostadas

Oh Tex-Mex, how do I love thee? Let me count the ways. You make bad days better. You are good for what ails me. You bring me joy, deliciousness, and comfort – without fail. You are variety with consistency. You are both crunchy and creamy. You are chile gravy with cheese. You are breakfast tacos. You are chips with nooks to fill with salsa. You are one of my favorites and I could eat you every day without boredom. Yes, Tex-Mex, you are my one of my all time favorites and I will never leave you.

Dearest reader, you may be thinking my love affair with Mexican/Tex-Mex food seems a little over the top. But as any good born-and-bred Texan knows: it is totally valid. Ask any of those poor displaced Texan souls who are living in the lands of poor quality Mexican eateries where spicy ketchup substitutes for salsa and they will tell you – their heart longs for that of which I speak. Bless the hearts of those who have lived away from the land of deliciousness for so long that they begin to actually think that the “Mexican” food in their area is an acceptable representation. Dear friends, hurry back to the Lone Star State! Hurry back to land of chile gravy, quality salsa, homemade guacamole, homemade tortillas, (corn and flour please!), and hole in the wall joints that will feed your soul. In the meantime, please consider this super simple meal to tide you over until then. There is nothing complicated or surprising about this dish, and truthfully, that’s part of why I think my perfectly portioned tostadas are so darn great.

Total Tostada Tastiness!

Part of what makes this dish so fabulous to me is the home-crisping of the corn tortillas. I know you can buy pre-crisped tostada shells at the supermarket so you may be thinking to yourself, “why would I need to buy regular tortillas to crisp when I can buy them that way and skip a step?” Well, in my opinion, home-crisped are superior in flavor and texture to the others. Plus, buying regular tortillas gives you flexibility in how to use the tortillas which does not come with the already crispy ones. Additionally, one cannot be certain of how the manufacturer made the shells crispy. If you make them at home – it is totally possible to do it without frying  (and in 2 steps) which helps keep it nutritionally sensible. Here, let me tell you how!

Baked up crispy!

Perfectly Portioned Tostadas

Ingredients
2 corn tortillas
1/2 cup refried beans – I used a no-fat canned variety
4 oz lean ground beef – I used 93% lean
1/4 cup grated cheese – I “cheated” and used pre-shredded Mexican blend that needed to be used. Normally, I use regular Cheddar.
preferred Mexican seasonings – I used adobo, and ancho chile powder for the beans and about 1.5 tbsp taco blend for the meat.
1/4 cup water
Pam or other cooking spray
salsa to taste

Steps
1. Preheat oven to 375. I have a pizza stone so I leave it in there to wait for the tortillas. No pizza stone? Try a cookie sheet.
2. Start to brown gr. beef over med-low to medium heat.
3. Grate (or measure!) cheese.
4. Mix seasonings into beef, then add 1/4 cup water and turn up heat just a bit. Bring to a boil and then reduce to a mild simmer, stirring occasionally. It will turn sort of saucy and a bit thicker. It’s done when it doesn’t look like beef sitting in water anymore.
5. Put beans on to heat through. Add in 3-4 shakes of your seasonings and stir.
6. Spray both sides of the corn tortillas with your cooking spray and lay flat on your cooking surface. Let bake for 5 minutes.
7. Check your tostada shells. If they aren’t done, flip them over for another 2 minutes and check every 1 – 2 minutes until they are the brownness and crispness you like. Once they start to turn though, keep a good eye on them because they’ll burn in a hot minute. Trust me.
8. Let shells cool while you taste your beans and meat and adjust seasonings as desired. I suggest layering your toppings: beans, beef, cheese, then salsa.
9. Take a bite and roll your eyes in culinary delight. 🙂

It really is pretty simple and can all be done in 20 minutes or less, which is an extra plus. If you feel the need to add things like lettuce or tomato to your tostada, go right ahead. Beans, meat, and cheese are really all I want when I”m making this dish. The shells can be topped with just about anything…guacamole, queso, beans and eggs, sauteed vegetable mix – whatever floats your boat. It’s really quite versatile. One could add onions or peppers to the meat mixture. Black beans could be subbed in for the refried beans. Spices can be changed up, decreased or increased to alter the flavor as well. The variations are, in my opinion, endless.

A note about the ground beef: As I am using a leaner meat, it’s important to cook it slower and over a lower heat so that it doesn’t overcook and dry out. I never went above #6 on my dial except to get it to boil, and then I turned it down to 3 or 4. Don’t rush it or you could be sorry. Again, trust me.  Adding the water helps with this at the end, but it cannot rehydrate overcooked meat. You can use a higher fat ground beef if you like and you won’t have to worry about it quite as much – but it’s still good to keep in the back of your head. As there are few ingredients in this dish, it would be difficult to camouflage dried out meat.

Cooking away

Finally, the bonus on top of all the other wonderfulness of this dish is that the ingredients are measured according to their serving size. This means you are eating a reasonable amount of food and, at least for me, coming out full on the other end. It also means the total caloric intake for these two tostadas is less than 500 calories, which in the world of Tex-Mex is sometimes hard to come by. I hope this recipe brings you as much joy as it does me. Happy eating! 🙂

Nutritional Information – 2 tostadas

Calories: 453
Fat: 19 g
Carbs: 33 g
Protein: 35 g
Fiber: 4 g

Carne Guisada (& Packaging Meat for One)

Mmmm…I love Mexican food. Love.it. Any item that does not contain mushrooms or squash is delicious and makes my mouth happy. As such, Mexican themed/inspired dishes make frequent appearances in my kitchen. Mexican food is a comfort food genre for me and it combines so many of my favorite individual ingredients. Typically when I go out to eat, I will order dishes that I can’t/don’t make at home. I feel better about paying the cost for something that I know is difficult for me to make. For the longest time, carne guisada was in that category of “too difficult to make.” Well, ladies and gents, that era may be coming to an end. Oh happy carne guisada day. 🙂

All done and so tasty!

Cooking for One Caveat: I told you that I’ll talk about how I manage cooking for one in a world that is not structured for single cooking. One such example are that multi-pound package of meat at the grocery store. Perhaps a family of 4 – 6 needs 2.33 lbs of chicken breast tenders…This single gal can’t even fathom using that much chicken in one dish. So here’s what I do. I buy the 2.33 lb package of chicken, or say, the 1.45 lb package of beef chunks, bring it home and within 24 hrs repackage the whole lot of it into single serve units. I’ll clean the chicken tenders, rinse the meat, and portion it out amongst (usually) 3 or 4 sheets of saran wrap. I try to portion equitably – but I just eyeball it. Then I wrap it up tiiiight, weigh it, write it on the saran wrap in permanent marker, and toss the single serve units into a freezer zip-top bag. Into the freezer they go and then I have a bag of meat, perfectly portioned for one. I will put roughly 3 chicken tenders per unit. Eyeball even beef chunk distribution. A package of four steaks gets broken down and individually wrapped. Weighing it helps me with recipes so maybe sometimes I need two portions or if a friend is coming over, I just thaw two instead of one. Plus, single serve units thaw faster than a mamajama package. Just because it comes packaged to feed a small army doesn’t mean you have to leave it that way.

So this is how I came to have a 6.5 ounce package of beef chunks…you know, the kind you make stew out of? Yep. Those. As they were already conveniently cut into small chunks, I thought they would be good to give carne guisada another try. A while back, I made a recipe that was good – but didn’t really fit the mental picture I had and so was kind of disappointing, actually. So I loosely followed the structure of the recipe while also making it up as I went along. The final results… freaking amazing good eats. I can see myself playing around with it a little more, but it was so good. I’m excited to tell you how to make the deliciousness for yourself. So without further ado…

What 6.5 oz of beef chunks looks like

Carne Guisada
(waaaaaay adapted from The Tex-Mex Cookbook by Rob Walsh)

Ingredients

6.5 oz beef chunks
generous 1/2 cup chopped up onion – I had a pretty small dice.
1/4 cup chopped peppers – I used jalapeño and anaheim because that’s what I had.
1 lg garlic clove – minced
2 tbsp canola oil (What the recipe suggested…I’m certain 1 tbsp would have been just fine.)
3/4 cup liquid – I used beef broth
1/2 cup canned diced tomatoes with some juice
1/2 tbsp tomato paste
1/2 tsp ancho chili powder – I’m certain regular chili powder would be just fine.
1/2 tsp adobo seasoning
1 tbsp flour/masa harina – I actually have masa…
1 tbsp water

Steps
1. Heat a skillet (that has a lid) and canola oil over med-high heat.
2. Add meat and let brown for a good bit. Don’t drain the juices. (The recipe suggests 10 min. I did not need that long.)
3. Add the onion and let cook for 2 -3 minutes until softened.
4. Add the peppers. Wait 1 – 2 minutes. Add the garlic clove. Wait 1 minute and add tomatoes. Give a stir and let it hang out for a few.
5. Add spices and mix all up.
6. Add the beef broth and tomato paste. Make sure the tomato paste gets mashed up/dissolves into the liquid. Stir.
7. Cover, turn down the heat to low, and let simmer for probably an hour or so. Yes, it is best to start this recipe BEFORE you are actually hungry. Stir it a few times during the hour.
8. Taste your meat after 45 minutes to see if it’s tender enough. Mine needed another 15 minutes, plus the recipe suggests an hour.
9. When your meat is done, mix the flour/masa with the water until there are no lumps left. Add to the pan and stir to combine. This will change the color and consistency of your dish. This is good news.
10. Let it simmer for a few minutes more while you do final meal prep. Serve and enjoy!

For me, this made 3 servings of 1/2 cup each. For dinner, I used it as a nacho topping. The following two days for lunch, I put it with refried beans and cheese in corn tortillas for two tacos. Sooo.good. When I make it again, I will likely use less oil. I think 2 tbsp turned out to be a bit excessive – at least for me. Please feel free to add things like potatoes or different peppers if it suits your fancy. You know best what you like to eat. Truthfully, the next time I buy a 1.45 lbs of beef chunks, I may just make the whole lot of it into carne guisada to freeze into individual servings (another good single eats tip!) for lunches or days when I don’t feel like cooking or waiting an hour to eat it. Yes, it is that good. I hope you enjoy! Happy eating!

These are tiny peppers from my balcony garden! It took all five to make 1/4 cup.

Nutritional Content for 1/2 cup
Calories – 167 (a significant portion came from the oil – another reason it’s going to get cut)
Fat – 9.1 g
Carbs – 6.3 g
Fiber – 1.5 g
Protein – 15.1 g
Iron – 10%